There are so many tools, some for Mac OS, others for Windows, different versions… Complicated. So let’s summerize a little bit.
If you have iPhone 3G, you’ll be able to install 3-rd party non AppStore applications (through separate applications called Cydia and Installer) and run these applications. If you have old iPhone, in addition to that you’ll be able to unlock the device (use with any carrier).
There are two methods: quickpwn and custom firmware method. First one is for quikly pwning and jailbreaking the device without restore. You should use it if you have unlocked device or an AT&T contract.
If you are Windows user:
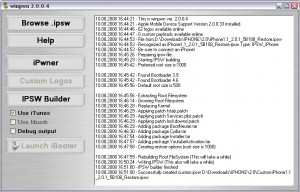
Go for WinPwn. The current version is 2.5.0.2 (also called 2.5 beta-2). Download . It supports both iPhone and iPhone 3G, firmwares 2.0, 2.0.1, 2.0.2. You can use either quickpwn or custom firmware method.
There is a separate QuickPwn tool for Windows. The current version is RC3. Download . Do you need it? Yes, if you want to quick pwn and you do not like WinPwn (or you had problems with it).
If you’re using Mac OS:
Go for PwnageTool. The current version is 2.0.3.1. Download . Works with 2.0, 2.0.1, 2.0.2 firmwares using custom-firmware method.
There is a version of QuickPwn tool for MAC OS. The current version is 1.0.0. Download . It works only with firmware 2.0.2. Do you need it? Yes, if you want to quick pwn.
QuickPwn is not a replacement for PwnageTool, they are different tools and provide different features, QuickPwn is for quickly pwning a device, whereas PwnageTool is designed to custom build and tailor the ipsw production process, both tools will be actively developed in the future.
QuickPwn for Windows is updated. Support for all 2.x firmwares is added. So now you can QuickPwn and jailbreak the device if it is running 2.0, 2.0.1 or 2.0.2.
DevTeam reminds that it is still beta software, so usual rules apply, no complaints if anything goes wrong and use the tool at at your own risk!
Using QuickPwn does not update the firmware itself, this tool is designed to ‘Pwn’ (the ability to install future custom non-Apple firmwares) , ‘Jailbreak’ and install Installer and/or Cydia on a given device. If your device is running 2.0.1 and you QuickPwn it, it’ll still be running 2.0.1, although it will now be Pwned and Jailbroken. It will also activate (not unlock) devices that are being used outside of their intended territories and cannot be activated using iTunes.
If you want to update to 2.0.2 then use the normal iTunes update to get to 2.0.2 and then use QuickPwn to Pwn, Jailbreak and Activate, remember that the 2.0.2 update includes a baseband update for the 3G iPhone, so depending what your long term intentions are for the phone, update wisely, of course in the upcoming PwnageTool application you’ll be able to create a custom ipsw without the baseband update enabled.
PwnageTool 2.0.2 released just a day ago. And now WinPwn – iPhone jailbreaker and unlocker for windows is avaliable. The main new feature – it supports firmware 2.0.1.
PwnageTool 2.0.2 is out. It will support new firmware 2.0.1. It will jailbreak and unlock the old iPhone and jailbreak new iPhone 3G. Here are the download links:
Installer 4 Beta is included, it is added in any mode by default. The main installer package management interface within PwnageTool isn’t enabled yet, and will report that installer.app isn’t available, but the actual Installer.app package is added as a default option in both modes.
The latest Cydia is also enabled by default. We recommend to use Cydia, not Installer.
Thanks to and the porting work of as well as the authors of , it is now possible to “tether” your iPhone 3G and use its Internet connection on your laptop.
Warning – Tethering your iPhone is against the iPhone data plan terms. AT&T could slap you with huge fees if you overuse this. I recommend only using it during emergencies.
Here is a basic plan (by the way, this should work for old IPhone also):
Jailbreak your iPhone 3G
Install 3Proxy and Terminal
Create an ad-hoc Wi-fi network using your laptop
Join the network with your iPhone
Find the iPhone’s IP address
Open Terminal and run the proxy program
Open Safari on your iPhone and open a web page
Configure your browser to use the proxy
Later we’ll discuss it with more details.
Step 1: Jailbreak your iPhone
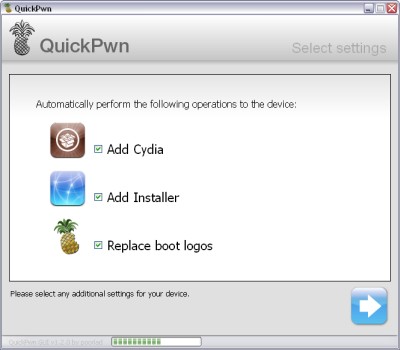
Just download PWNageTool 2.0. Run it and follow the instructions. Make sure to add Cydia, when asked.
Step 2: Install 3Proxy and Terminal
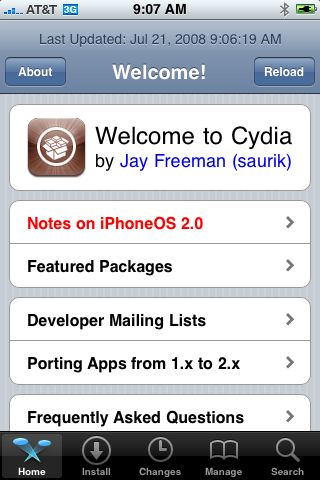
During the jailbreak, Cydia should have appeared on one of your app pages: use it and let Cydia load and self-update.
Then head to Install, All Packages, then find MobileTerminal and 3Proxy (3Proxy is at the bottom). Install both and hit your Home button. Your phone will restart and you’ll see Terminal installed on your home screen. 3Proxy isn’t a GUI app and as such won’t have an icon.
Step 3: Create an ad-hoc Wifi network using your laptop
Using whatever wireless software suite you have, create an ad-hoc network. On a Mac it’s in the Airport menu, under “Create network…”. Name it something inconspicuous. I called mine “baladoux”. On your iPhone, join the ad-hoc network.
Step 4: Find your iPhone’s IP address
Then, hit the blue arrow next to it, and wait for your IP address to show up:
Memorize (or write down) this IP address. You will need it later.
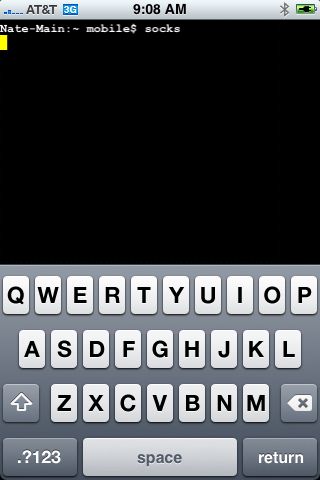
Step 5: Open Terminal and run the proxy program
Simple enough. Open Terminal, type “socks” and hit return.
Nothing will appear to happen, but the SOCKS server will be running. You can hit the home button to push Terminal to the background (remember to terminate it later, by switching back to Terminal and holding the Home button until it closes).
Step 6: Open Safari on the iPhone and open a web page
Any page will do. I recommend http://pwnagetool.ru
This step is important. The page will take a while to load. When Safari realizes it can’t get to the Internet using the ad-hoc Wifi, it will do some internal magic to switch back to 3G for Internet while still on your ad-hoc network. That lets the proxy do its thing.
Step 7: Configure your browser
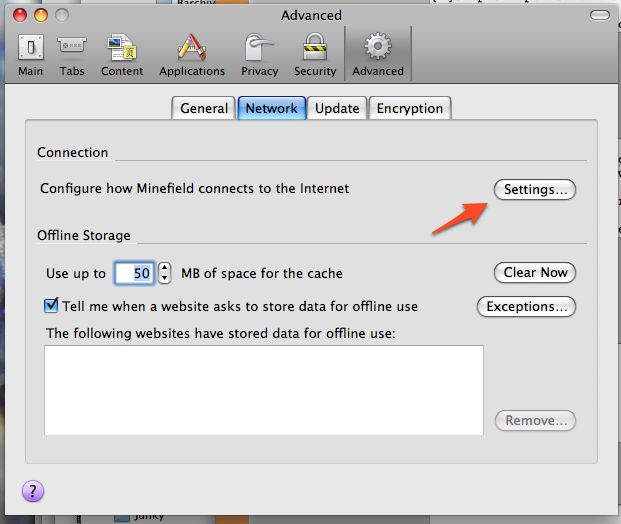
In Firefox, head to Preferences, and under Advanced, Network, hit Settings:
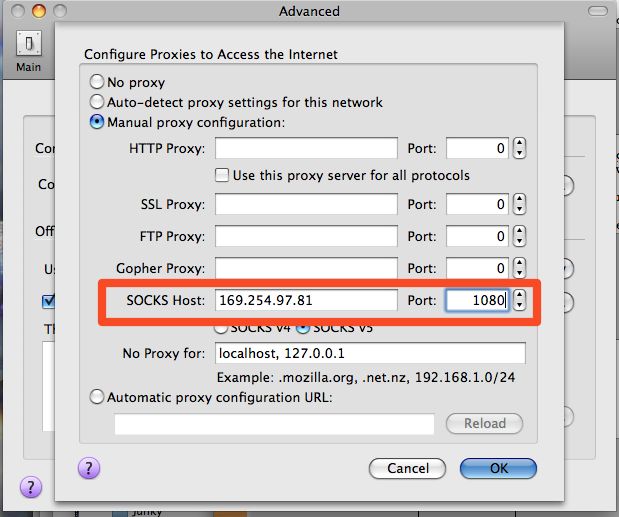
Then, fill in the iPhone’s IP address (which you memorized earlier) into the SOCKS Host field, and put 1080 as the port number. Make sure all other proxy fields are blank and/or 0 as shown:
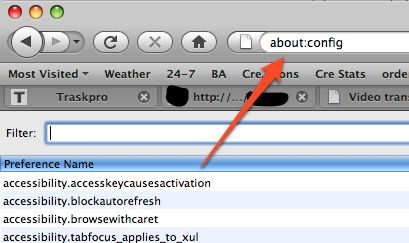
Then, since the proxy doesn’t forward DNS, you will also have to change an advanced option in Firefox. In the Firefox URL bar, enter “about:config” and hit Enter
In Filter, type “socks” and then double-click “network.proxy.socks_remote_dns” to make its value “true”.
That should be all you need! Firefox should be able to browse the Internet through your iPhone’s 3G connection.
Tethering costs a lot of battery life on the iPhone so make sure you have it plugged in. When you’re done, make sure to quit Terminal by opening it back up and pressing and holding the Home button until it quits.


